BOX: Using Box Capture
Prerequisites
You must have an iOS device (iPhone or iPad).
Overview
Capture is a mobile application you can use to capture photos, videos, and audio recordings with your mobile device and upload directly to Box, making it easy to share content no matter where you are.
To start using Box Capture, first download and install the app from the Apple App Store.
This user guide covers the following:
|
|
App Settings |
|
|
To access your Box Capture app settings, navigate to the Recents screen, then tap the Settings icon in the top-left corner. Use the following settings: Security
Camera & Uploads
Cache
|
|
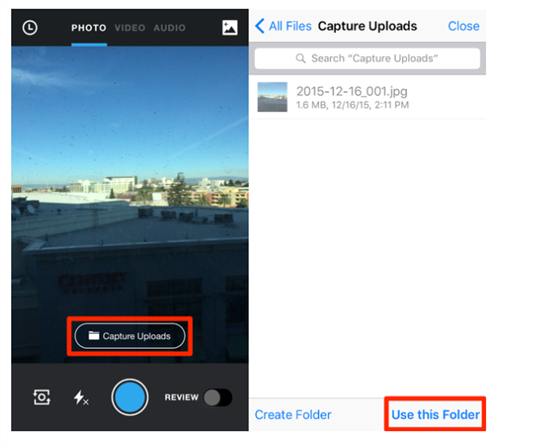
Capturing Content with your DeviceCapturing Images, Videos and Audio FilesIf it is your first time using Box Capture, give the app permission to use the camera and microphone on your device by tapping Allow when prompted. By default, Box Capture saves your captured content to a new folder named Capture Uploads, located on the All Files page. It is recommended to change the upload location to a project folder - for example, the Progress Photos and Videos folder - in order to have the content accessible to others working on the same project. Note: You can optionally select the Review slider at the bottom right of the screen to review captured content before uploading to Box. 1. Select the type of media you want to capture:
2. Select the folder where you want to upload the captured media.
3. Tap the circle at the bottom of the screen to capture an image. For recording video or audio, tap the circle once to begin recording, and again to stop recording. |
|
Importing Existing Content to BoxYou can also import existing images or videos from your device. 1. Tap the Gallery icon at the top right of the screen. If prompted, give Box Capture permission to access your Gallery by tapping Allow. 2. Tap an image or video to select it. You can select multiple images of videos and upload them all at once. MetadataWhen you capture photos and videos, Box Capture can also capture geolocation metadata. When the Save Location Metadata setting is enabled (see App Settings), all captured photos and videos will be tagged with metadata corresponding to the location where they were taken. |
|
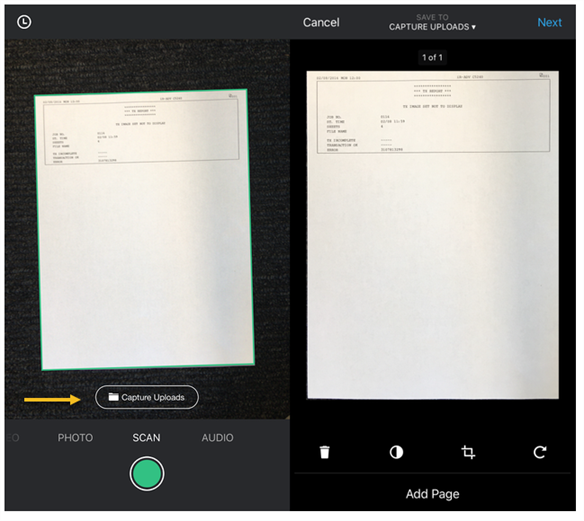
Scanning DocumentsUse the Scan feature to capture pictures of documents and have Box Capture automatically optimize the images for increased legibility. Once in Scan mode, Box Capture will automatically detect any documents that are in the camera's line of sight. Make sure that the edges of your document are within the frame for best results. 1. Select SCAN at the bottom of the screen. 2. Aim the device camera at the document you want to scan. Box Capture will detect the document. Wait for the green border to outline your document.
3. Tap the circle to scan. Note: Don't worry if your document is tilted or at an angle - Box Capture will automatically crop and de-skew the scan. Once your document is scanned, the Scan Sandbox screen is displayed. From here you can:
4. Once you are finished editing the scan and adding pages, tap Next in the upper-right corner of the screen. The Review screen is displayed (Review is always enabled for document scans). 5. Edit the document name and optionally, add comments. 6. Upload the scan to Box. |